Introduction
I’ve been looking for a low cost laptop to travel with and generally put in harms way for a while now. It was suggested to me that maybe a Chromebook would fit the bill.
Initially I had a play with ChromeOS Flex, which allows installation of ChromeOS on standard PC hardware to see what the experience would be like.
Turns out it’s really quite neat. Combined with the Linux developer feature, a lightweight VM running Linux within ChromeOS. Similar in a way to Microsoft’s WSL, I felt it would offer everything I needed. So took the plunge and purchased an ASUS CR1100CKA featuring an Intel Celeron N4500, 4GB of RAM and 64GB of storage.
The ASUS CR1, for the price is a very neat little machine in my opinion. Both the keyboard and trackpad are very usable. The screen isn’t the best viewing angle wise but is quite acceptable otherwise. It has decent number of USB ports (2 x USB-A and 2 x USB-C) along with an integrated MicroSD card reader.
Things got off to a good start, I was able to install the few Linux apps I use day-to-day for remote desktop purposes. I was able to try this in advance with ChromeOS Flex so was hopeful that they’d work.
I then started to look for a mail client to access my IMAP email. There were a few Android apps on the play store that might have worked, however none of them looked either trustworthy or well featured. So the first compromise was made, using my email provider’s webmail service.
Next I installed the app for BitWarden, the password manager I use. Available in the Play store it installed without a hitch but upon opening it appeared to be a mobile / tablet app that the Chromebook was able to run, rather than a dedicated app for the Chromebook. I was therefore presented with an option of displaying it as either a phone or tablet app. Not too much of a problem, it works just fine and given the number of platforms they support I can’t blame them for not making a dedicated ChromeOS port.
Having got things largely working I gave the MicroSD card reader a try, dropping in a memory card from my GoPro. Slightly surprisingly it wouldn’t play any of the media. Recording a few test videos it seems H264 playback was supported, but H265 was not. A bit of Googling later, I was able to confirm that the N4500, a 10th generation, Jasper Lake family processor does indeed feature H264 and H265 hardware decoding support. Google had recently added support for hardware HEVC decoding in supported hardware as part of release 107. As I was running release 109 it should have been supported. Other search results (and I’m sure an official Google page, which I’ve subsequently failed to relocate) indicated that HEVC was only supported on 11th generation processors and beyond. Unlike email and apps this problem doesn’t have a workaround 😔.
It was at this point I was considering that maybe I’d made a mistake and that a Chromebook wasn’t really for me. What I really needed and probably should have just spent a little more on to begin with was a cheap Linux powered laptop. Or a one-time boot Windows powered laptop, if you catch my drift 😉. This got me thinking, ChromeOS is build on the Linux kernel, could I just install my preferred distribution in place of ChromeOS. The answer is yes….if you accept the challenge / can be bothered with the faff.
Developer Mode
Chromebooks are by design very secure, they will only boot operating system images signed by Google with the help of their onboard trusted platform module (TPM).
They do however feature developer mode, which when enabled loosens the security restrictions somewhat. Providing both root/shell access along with the ability to run unsigned ChromeOS images. Such as developer builds of ChromiumOS via USB or SD card.
Developer mode additionally permits the installation of an alternative or “legacy” bootloader, a BIOS or UEFI based bootloader alongside the secure boot gubbins. Further information is available on the Chromium developer notes page. While investigating this process I found MrChromebox.tech’s site, which is linked to from the Chromium page. It provides an excellent summary of the various boot modes along with alternative firmware images (developed by MrChromebox.tech), installed by way of a convenient Firmware Utility Script.
The first step to installing Linux is therefore entering developer mode as described in the ChromiumOS Docs and summarised below.
Recovery mode must first be entered by holding the “Esc” and “Refresh” buttons on the top row of the keyboard, before pressing the power button.
Once in recovery mode, developer mode can be entered by pressing “Ctrl + D” followed by “Enter”.
Once in developer mode you will be presented with a new dialog offering to “Return to secure mode” or “Boot from internal disk”. Select “Boot from internal disk”.
During the entry to developer mode the Chromebook will be erased, returning it to factory defaults which presents you with the initial “Welcome to your Chromebook” screen.
Here sign-in to you wireless network, but select “Browse as Guest” from the bottom left corner when prompted. You could sign-in to your your Google account but there’s no real need.
Alternative Bootloader
Once a web browser is reached, navigate to MrChromebox.tech’s website and follow the notes on launching his firmware update script. I’ve summarised these below.
Press “Ctrl+Alt+t” to open a “crosh” shell, followed by executing “shell” to enter a bash shell.
Next launch MrChromebox.tech’s firmware updater script as follows:
cd; curl -LO mrchromebox.tech/firmware-util.sh && sudo bash firmware-util.sh
At this point you should find yourself presented with the following:
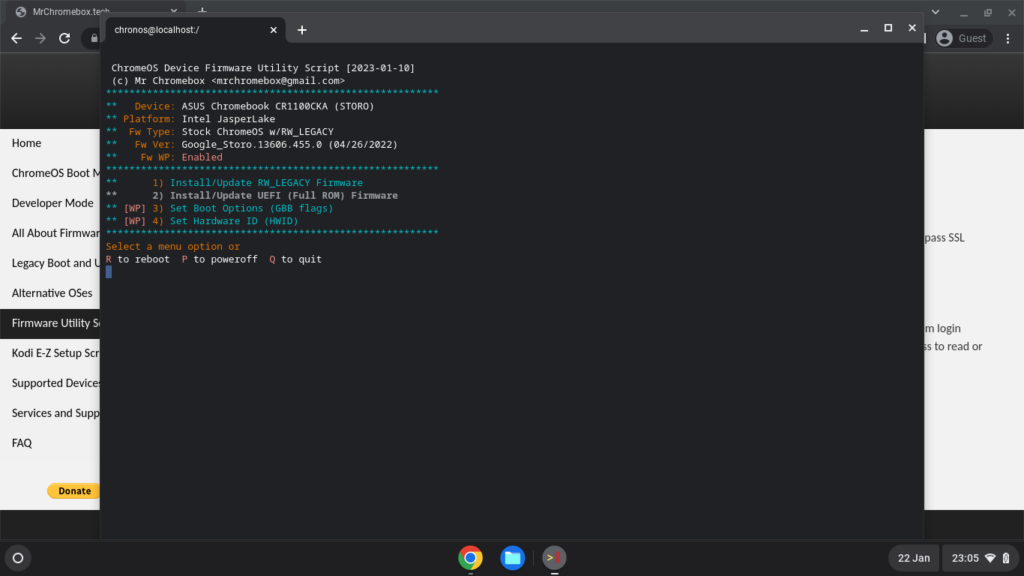
Next select the “Install/Update RW_LEGACY Firmware” by typing “1” followed by “Enter”. After a short while you should be presented with the following:
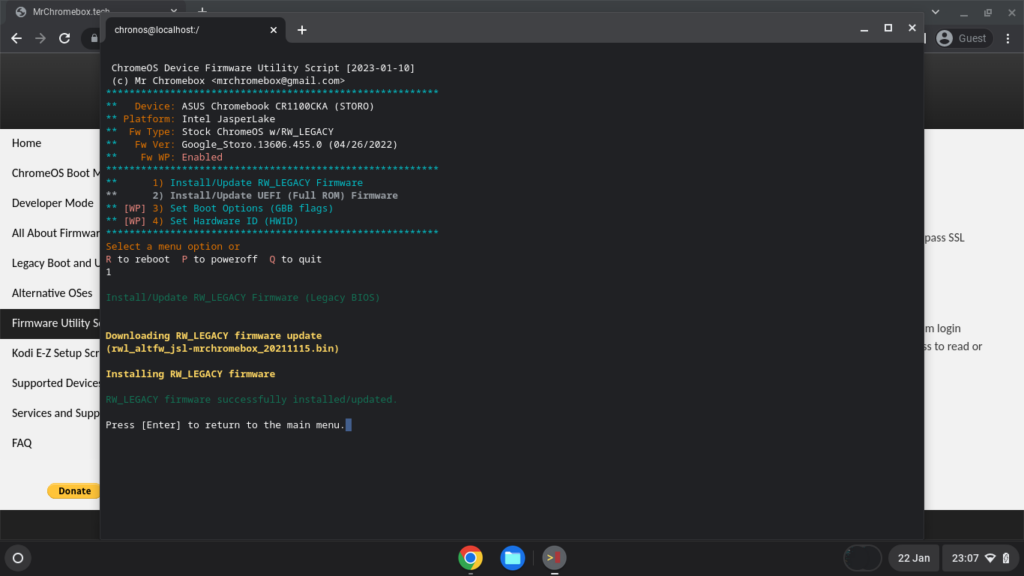
Press “Enter” to return to the main menu, followed by “q” and “Enter” to quit.
Update 05/02/23: The following step shouldn’t be required based on MrChromeBox.tech’s comment as the updater script performs it automatically and is only here now for reference. You should be able to skip straight to rebooting.
Having installed an alternative bootloader we need to instruct the Chromebook’s bootloader to provide it as an option. Whenever the system boots the normal ChromeOS bootloader will run, before chain loading the alternative bootloader. Which will in turn boot Linux. Notes on this can be found on the ChromiumOS site, again summarised below.
sudo crossystem dev_boot_altfw=1
If all goes well this command shouldn’t produce any output.
From this point, depending on your chosen distribution, installation should proceed much like any PC installation. See the next section for notes on the distributions I’ve tested with.
Having prepared an installation USB stick for the distribution of your choice reboot the ChromeBook via:
sudo reboot
Having rebooted and returned to the bootloader we’re presented with a new option “Select alternative bootloader”. Select this and when prompted, choose “TianoCore”, this is the UEFI bootloader we just installed.
What comes next is a logo of a running hare (or rabbit), the UEFI bootloader splash screen. Hit “ESC” and enter the “Boot Menu” selecting your USB stick as the boot device.
At this point the installer of your choice should boot and the installation is pretty much like that of a PC. The internal eMMC can be formatted replacing ChromeOS with Debian.
This is what I initially did….and everything went well. Following the installation I again entered the UEFI bootloader, this time allowing the system to boot into my selected distribution on the eMMC drive.
Everything was going well….until it wasn’t. While exploring which bits of hardware work and which didn’t I requested the system to enter standby. Everything seemed to go well, the screen powered off and power LED began flashing. Upon hitting a key to resume from standby I was greeted by the recovery mode menu. I didn’t think much of it, maybe there was an issue with suspending to RAM that required investigation. I shut the machine down via the menu prompt.
Upon powering it back up the “Select alternative bootloader” button was missing. This is apparently by design. If the bootloader detects a problem, it enters recovery mode and in doing so disables the alternative bootloader option. It would have been simple enough to have booted ChromeOS again and re-enabled it via the “crossystem dev_boot_altfw=1” command as before. However ChromeOS had been replaced by Linux. At this point I’d made a bit of a brick. The “Boot from internal disk” option was a no go as there was no ChromeOS to boot and “Return to secure mode” wouldn’t be possible as there was no ChromeOS to return to. The only option was to create a ChromeOS recovery USB stick using Google’s Chromebook Recovery Utility. Following the instructions I was back in ChromeOS in no time. Lesson learnt….this would be a delicate dance.
I repeated the steps above but this time installed to a location other than the eMMC, in my case a USB memory stick. I attempted to use the internal microSD reader but the UEFI firmware isn’t able to boot from it. I’d therefore recommend installing on an external device if you’d like to test the setup before committing too much time to it.
If you are committed to replacing ChromeOS with Linux you may want to skip ahead to the section on setting the boot options. This is aimed at having the ChromeOS bootloader prefer the alternative bootloader, while preventing it from dropping the option in the case of error. Before returning to the next section on installing Linux.
Installing Linux
Now comes the hardest part….selecting a Linux distribution. This is where things get a little choose your own adventure.
I’d initially planned on installing my goto distribution Debian, which I did. Slowly bringing up each device up until I had a functional system. Then for fun I thought I’d give Ubuntu, or in my case Xubuntu (which uses the Xfce lightweight desktop environment) a go. After a small issue launching the installer I was pleasantly surprised that most devices were working out of the box. Only standby and the sound card required some help, which could borrow directly from my previous efforts getting Debian up and running.
I’ve captured notes for both…just in case I change my mind in the future. My tip though, if you want an easy, potentially lower maintenance route, choose Ubuntu.
For Debian installations follow this path.
For Ubuntu / Xubuntu installations follow this path.
Updating Boot Options
The final part of installing Linux on the ASUS CR1 and other Chromebooks is updating the boot options. This prevents developer mode from be disabled accidentally while ensuring that the legacy bootloader is launched in preference to ChromeOS without any user interaction.
Having had my little locked out of the OS scare early on I would have, in hindsight, completed this step before installing Linux. However it isn’t a small task in and of itself so you may want to leave it till the end as I did.
The firmware flash is write protected by default, preventing the boot options from being modified. The first step is therefore to disable this protection.
MrChromebox.tech’s website contains a page on supported devices which details the write protection mechanism in use by various generations and model of Chromebook.
The “ASUS Chromebook CR1100CKA” is listed as having its write-protection line controlled by Google’s CR50 trusted platform module.
While older models of Chromebook required the hardware to be disassembled to disable the write-protection. Via a switch, or a special screw acting as a switch contact, or by disconnecting the battery. Newer models featuring the Google Security Chip (also known as the CR50, which is apparently the name of the OS running on the chip) can have their write-protection disabled via Google’s closed case debugging (CCD) technology.
Given that my ASUS model features the CR50, I’ll be focusing on the CCD method here.
My primary source of information has again been MrChromebox.tech’s website which details how the hardware write-protection can be disabled using CCD and the CR50 security chip.
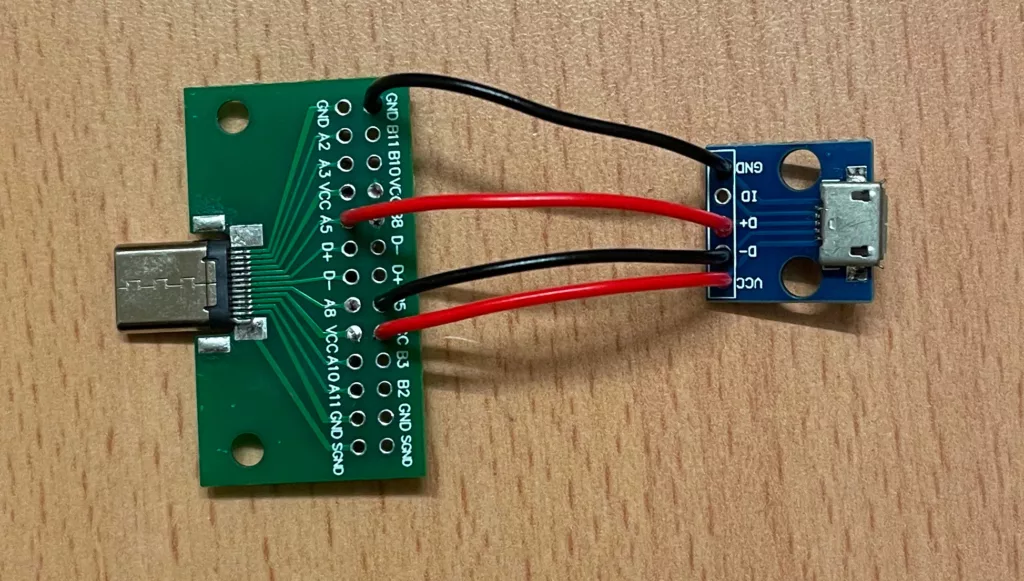
Having identified the Chromebook as containing a CR50 the next step of disabling the write-protection is to buy or build a CCD debugging cable, known as a SuzyQ cable.
Information on this cable is available on the ChromiumOS documentation, which includes a schematic and additionally provides information on how a simple cable may be constructed, allowing for communication with the CR50.
The fully featured SusyQ cables appear to be pretty hard to get hold of at the time of writing. I therefore had a go at building my own, using a USB-C male breakout board, a couple of resistors and an old USB A cable using notes provided in the ChromiumOS documentation.
| Type C Male | Other host (Type A Male) |
|---|---|
| A8 (SBU 1) | D+ |
| B8 (SBU 2) | D- |
| A4, A9, B4, B9 (VBUS) | VBUS, 5V |
| A5 (CC1) | 22 kΩ resistor to VBUS |
| B5 (CC2) | 56 kΩ resistor to VBUS |
| A1, A12, B1, B12 (GND) | GND |
I naturally chose the cheapest USB-C breakout board eBay had to offer, which turned out not to be such as good idea. While the connector was a male, the silkscreen on the board was printed as if the connector was going to be female. Therefore my first attempt writing as shown above did not yield the expected results. I found a StackExchange post whereby the user was having the same problem as me and who had recognised the error in the silkscreen and produced an updated pinout to match the incorrect silkscreen.
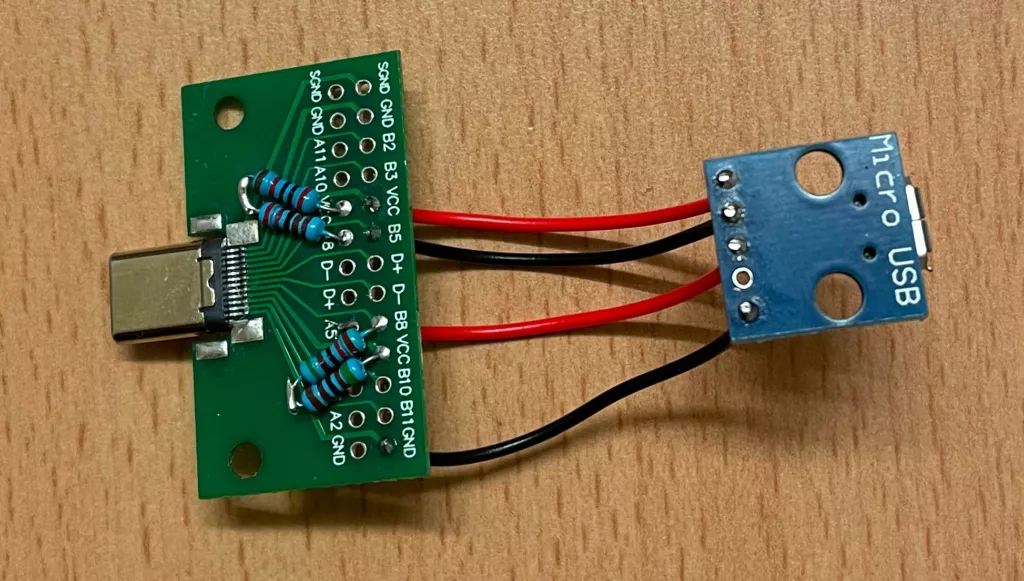
Here’s my completed SusyQ cable. I chose a mini USB breakout board which was kicking around my parts bin in preference to sacrificing a USB A cable and ended up using pairs of resistors in series to make up the correct values.
Having assembled the cable I connected it to the USB-C connector on the back, left of the Chromebook and the other end to a second machine. If all is well the a device should enumerate on the second machine with “Cr50” in its name. If no device enumerates try the USB-C connector the other way up, as the SusyQ cable is keyed. If a device still doesn’t enumerate try the other USB-C connectors on the machine, again in both orientations.
The next step involves returning to MrChromebook.tech’s notes.
We need to change the CR50’s state from “closed” to “open”, allowing for debugging, or in our case modification of the write-protect status. To do this:
- Under ChromeOS Launch a “crosh” shell via:
- Ctrl+Alt+t
- Change to a bash shell via:
shell
- Check CCD status via:
sudo gsctool -a -I- The tool should report the status as closed.
- Open the CCD via:
sudo gsctool -a -o- You will be prompted to assert physical presence (PP), which simply means to briefly press the power button when instructed. This takes ~3 minutes, after which the device will reboot and exit developer mode.
- Re-enter developer mode as described above.
Having re-entered developer mode, connect the SusyQ cable to the Chromebook itself this time. That is connecting both the USB-C and USB-A cables to the Chromebook. Then:
- Under ChromeOS Launch a “crosh” shell via:
- Ctrl+Alt+t
- Change to a bash sell via:
shell
- List connected USB UART interfaces via:
ls -l /dev/ttyUSB*- You should see three (ttyUSB0, ttyUSB1 and ttyUSB2), these are the CR50.
- Change to a root shell via
sudo su -
- Disable hardware write-protection via:
echo "wp false" > /dev/ttyUSB0echo "wp false atboot" > /dev/ttyUSB0
- Enable all CCD functionality:
echo "ccd reset factory" > /dev/ttyUSB0
- Verify changes via:
gsctool -a -I- All flags should be set to Y/Always. Note the values next to them in parentheses are the defaults.
crossystem wpsw_cur- Write-protection switch status should be 0 (i.e. not write-protected)
With write-protection now disabled we can launch MrChromebox.tech’s firmware updating script and use the additional features now available to us to change the boot flags.
Launch the script via:
cd; curl -LO mrchromebox.tech/firmware-util.sh && sudo bash firmware-util.sh
This time select option 3 “Set Boot Options”, followed by option 1 or 2 depending on your preference.
For me the process appeared as follows:
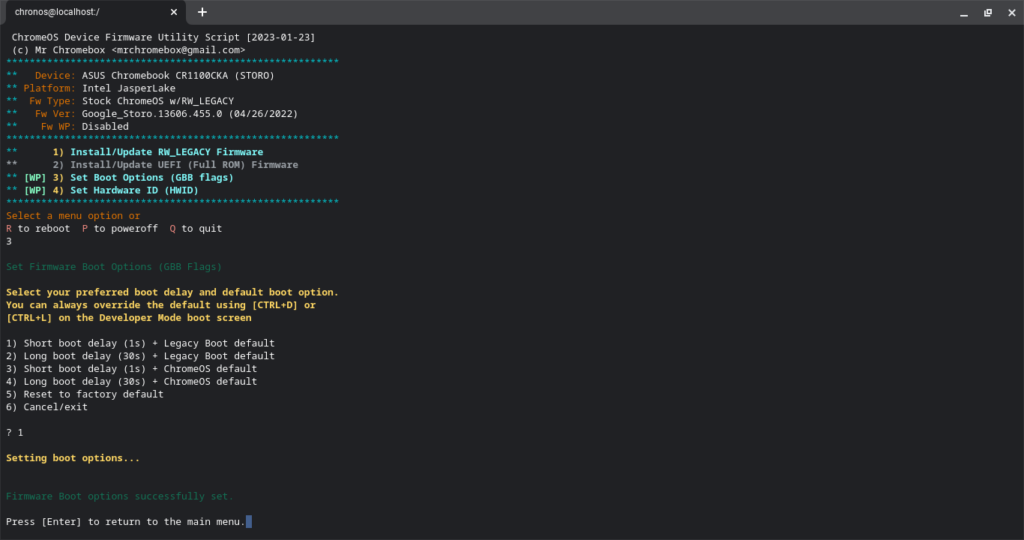
Hit Enter as directed to return to the main menu followed by Q to quit.
With this change in place, not only will the alternative bootloader be automatically selected at boot but developer mode cannot be disabled. I’ve repeated my failed standby test and can confirm that this is the case. I’m still able to select the alternative bootloader after this test, whereas I previously wasn’t.
If you’ve got this far, congratulations you’ve got Linux running on your Chromebook.
Leave a Reply