Introduction
This post continues from where I left off previously installing Linux on my new Chromebook. This post is concerned with installing Debian. While Debian appears to work well on the Asus CR1 I also attempted to install Ubuntu, which for this particular model is an all round easier install. I’ve dedicated a separate post to installing Ubuntu.
The following steps assume you have already entered developer mode on your Chromebook. Have flashed an alternative firmware and understand how to enter the firmware and boot from an external device. If not these initial steps are explained in my previous post.
Installation
First download the Debian installation media from the distribution’s download site. I selected the latest Debian Live image, 11.6 Bullseye at the time of writing, with the lightweight Xfce desktop environment.
I initially tried a network install CD, but the onboard wireless required firmware to be loaded, which would have to be supplied to the installer separately. I attempted to connect a USB Ethernet adapter which again required additional firmware.
I also tried the larger DVD installer, which includes more packages for offline installations. I was able to complete the install with this however ended up with GRUB configuration issues. GRUB was installed and starting but didn’t appear to have access to it’s configuration. Mounting the EFI partition with the installer’s rescue mode all appeared well with the configuration files yet it was still having issues.
The Live CD route therefore seemed to work the best. While it doesn’t include Wireless networking drivers it does include support for some USB Ethernet adapters, my Realtek RTL8152 based adapter being one of them.
Having downloaded the installation media, write it to a USB memory stick. On macOS I used balena Etcher for this.
Insert the USB memory stick into the Chromebook and boot from it.
Once booted to the desktop select the “Install Debian” shortcut. Installation should proceed like any other.
Once installation is complete, don’t allow the installer to restart as suggested. Instead apply the bootloader tweak described in MrChrombox.tech’s FAQ, see the question “I’m using your UEFI firmware, installed my OS [Linux], and it still boots to the EFI shell – what do I do?”. It seems that Debian doesn’t install GRUB in the location expected by the UEFI firmware. Therefore a copy needs to be made in the correct location. Assuming you’re installing on the internal eMMC drive, launch a terminal and execute:
sudo su
mkdir /media/boot
mount /dev/mmcblk0p1 /media/boot
cp /media/boot/EFI/Debian/grubx64.efi /media/boot/EFI/boot/bootx64.efi
umount /media/boot
If you’re installing to an external USB device for testing, swap out the device node above as appropriate, for example /dev/sda1.
Having completed the installation remove the memory stick and reboot as instructed. Allowing the Chromebook to boot into Debian for the first time.
Fixing The Broken Bits
There were quite a few things that weren’t working:
- Wi-Fi
- Audio
- Bluetooth
- MicroSD card reader
- Video acceleration
- Suspending to RAM
Updates
While not strictly required, I’d recommend applying any available updates before continuing via:
sudo apt-get update
sudo apt-get upgrade --with-new-pkgs
MicroSD Card Reader
While not necessarily the most logical item to fix first, it makes sense in a way. It seems that Linux kernel 5.10 as used by Bullseye doesn’t include a driver for the MicroSD card reader. Luckily Linux kernel version 6.0 is available via buster’s backports repo and includes a driver.
First enable the backports repository:
echo "deb http://deb.debian.org/debian bullseye-backports main non-free" | sudo tee /etc/apt/source.list.d/backports.list
sudo apt-get update
Next install the kernel from the backports repository:
sudo apt-get install -t bullseye-backports linux-image-amd64
After rebooting the MicroSD reader should now be working.
Wi-Fi
In order to get the Wi-Fi woking we need to install the proprietary firmware package. Having added the non-free archive while enabling backports above, we can install the latest version Debian has available:
sudo apt-get install -t bullseye-backports firmware-iwlwifi
After rebooting the Wi-Fi should now be working.
Video Acceleration
Similarly to Wi-Fi above, the video hardware requires firmware installing, again from non-free backports. Usually I’d just install “firmware-linux-nonfree”, however this brings in packages we don’t need, for example for AMD platforms. Instead we can install:
sudo apt-get install -t bullseye-backports firmware-misc-nonfree
After rebooting the video acceleration should be working. The presence of video acceleration can be checked with:
sudo apt-get install vainfo
vainfo
If all is well a list of supported video profiles should be returned.
Bluetooth
With the Wi-Fi firmware installed the Bluetooth hardware should now be available. In order to manage it the software is required:
sudo apt-get install blueman
After logging out and back in the Bluetooth icon will appear in the tray.
Audio
As with the other hardware we’re missing firmware. We can install intel signed and community firmware using the following:
sudo sed -i 's/main/main contrib non-free/g' /etc/apt/sources.list
sudo apt-get update
sudo apt-get install firmware-sof-signed
The hardware should accept the Intel signed firmware. The version supplied with Debian (1.7 at the time of writing) fails validation for some reason. Chromebooks (I believe in general) also accept community firmware versions. Therefore we can update the firmware symlink for the Jasper Lake image to reference the community signed version which will be loaded successfully.
sudo ln -sf community/sof-jsl.ri /lib/firmware/intel/sof/sof-jsl.ri
This gets the audio hardware working at the ALSA (Advanced Linux Sound Architecture) level, but not at the PulseAudio level (the sound server used by Debian to allow multiple applications to access to the audio hardware at the same time).
PulseAudio previously had a configuration system of its own whereby you could describe a sound card’s input and outputs to it. While this still exists, it will, if available, read ALSA’s UCM (use case manager) configuration for the system’s sound hardware and generate its own runtime configuration from that.
Nosing around ChromeOS before replacing it with Debian I discovered that the Google folks have developed their own lightweight sound server called CRAS (chrome audio server). CRAS similarly to PulseAudio makes use of ALSA’s UCM system to configure itself automatically.
I was therefore able to find a stash of UCM configuration files on the Chromebook. Unfortunately there were quite a few and it wasn’t immediately obvious which set were in use. Thankfully the ChromiumOS developer information site came to the rescue. The ASUS CR1100’s board name is “dedede”, which allowed me to find the appropriate UCM files, which are available in the ChromiumOS repositories here.
Unfortunately these files are in the original UCM format, while the ALSA project had moved onto their next generation UCM2 format. Thankfully they were pretty close as is, and converting them wasn’t much of a problem.
In order to add the configuration first create a directory for the sound card. The naming here is very specific as ALSA looks up configurations via the sound card names.
sudo mkdir /usr/share/alsa/ucm2/sof-rt5682
Next create a configuration file for the sound card:
sudo tee /usr/share/alsa/ucm2/sof-rt5682/sof-rt5682.conf << 'ENDL'
Syntax 3

SectionUseCase."HiFi" {
	File "HiFi.conf"
	Comment "Default"
}
ENDL
Then create the “HiFi” use case referenced by the sound card:
sudo tee /usr/share/alsa/ucm2/sof-rt5682/HiFi.conf << 'ENDL'
SectionVerb {
	Value {
		FullySpecifiedUCM "1"
	}
	EnableSequence [
		cdev "hw:sofrt5682"
		cset "name='Headphone Jack Switch' off"
		cset "name='HPOL Playback Switch' off"
		cset "name='HPOR Playback Switch' off"
		cset "name='Stereo1 DAC MIXL DAC L1 Switch' 0"
		cset "name='Stereo1 DAC MIXR DAC R1 Switch' 0"
		cset "name='Stereo1 ADC L Mux' 0"
		cset "name='STO1 ADC Capture Switch' on"
		cset "name='RECMIX1L CBJ Switch' 1"
		cset "name='IF1 01 ADC Swap Mux' 2"
		cset "name='CBJ Boost Volume' 3"
		cset "name='STO1 ADC Capture Volume' 20"
		cset "name='Stereo1 ADC L1 Mux' 1"
		cset "name='Stereo1 ADC R1 Mux' 1"
		cset "name='Stereo1 ADC MIXL ADC2 Switch' 0"
		cset "name='Stereo1 ADC MIXR ADC2 Switch' 0"
		cset "name='Stereo1 ADC MIXL ADC1 Switch' 1"
		cset "name='Stereo1 ADC MIXR ADC1 Switch' 1"
                cset "name='PGA1.0 1 Master Playback Volume' 32"
                cset "name='PGA2.0 2 Master Playback Volume' 32"
                cset "name='PGA5.0 5 Master Playback Volume' 32"
                cset "name='PGA6.0 6 Master Playback Volume' 32"
                cset "name='PGA7.0 7 Master Playback Volume' 32"
	]
	DisableSequence [
	]
}

SectionDevice."Speaker" {
	Comment "Speaker"
	Value {
		PlaybackPCM "hw:sofrt5682,0"
		DspName "speaker_eq"
		PlaybackPriority 500
	}
	EnableSequence [
		cdev "hw:sofrt5682"
		cset "name='Left Spk Switch' on"
		cset "name='Right Spk Switch' on"
	]
	DisableSequence [
		cdev "hw:sofrt5682"
		cset "name='Left Spk Switch' off"
		cset "name='Right Spk Switch' off"
	]
}

SectionDevice."Headphones" {
	Comment "Headphones"
	Value {
		PlaybackPCM "hw:sofrt5682,1"
		PlaybackMixerElem "DAC1"
		JackControl "Headphone Jack"
		PlaybackPriority 600
	}
	EnableSequence [
		cdev "hw:sofrt5682"

		cset "name='Headphone Jack Switch' on"
		cset "name='HPOL Playback Switch' 1"
		cset "name='HPOR Playback Switch' 1"
		cset "name='Stereo1 DAC MIXL DAC L1 Switch' 1"
		cset "name='Stereo1 DAC MIXR DAC R1 Switch' 1"
	]
	DisableSequence [
		cdev "hw:sofrt5682"

		cset "name='Headphone Jack Switch' off"
		cset "name='HPOL Playback Switch' 0"
		cset "name='HPOR Playback Switch' 0"
	]
}

SectionDevice."HDMI1" {
	Comment "HDMI1"
	Value {
		PlaybackPCM "hw:sofrt5682,2"
		JackDev "sof-rt5682 HDMI/DP,pcm=2"
		PlaybackPriority 100
	}
	EnableSequence [
	]
	DisableSequence [
	]
}

SectionDevice."HDMI2" {
	Comment "HDMI2"
	Value {
		PlaybackPCM "hw:sofrt5682,3"
		JackDev "sof-rt5682 HDMI/DP,pcm=3"
		PlaybackPriority 200
	}
	EnableSequence [
	]
	DisableSequence [
	]
}

SectionDevice."HDMI3" {
	Comment "HDMI3"
	Value {
		PlaybackPCM "hw:sofrt5682,4"
		JackDev "sof-rt5682 HDMI/DP,pcm=4"
		PlaybackPriority 300
	}
	EnableSequence [
	]
	DisableSequence [
	]
}

SectionDevice."Headset Microphone" {
	Comment "Headset Microphone"
	Value {
		CapturePCM "hw:sofrt5682,1"
		CaptureMixerElem "Headset Mic"
		JackControl "Headset Mic Jack"
		CapturePriority 200
	}
	EnableSequence [
		cdev "hw:sofrt5682"
		cset "name='Headset Mic Switch' on"
	]
	DisableSequence [
		cdev "hw:sofrt5682"
		cset "name='Headset Mic Switch' off"
	]
}

SectionDevice."Internal Microphone" {
	Comment "Internal Microphone"
	Value {
		CapturePCM "hw:sofrt5682,5"
		CaptureChannels 4
		CaptureChannel0 0
		CaptureChannel1 1
		DspName "dmic_eq"
		CapturePriority 100
	}
}
ENDL
After which restart the machine.
You should now have audio devices appear in the PulseAudio mixer. You may need to specifically select Speakers / Internal Microphone within the mixer settings, for example:
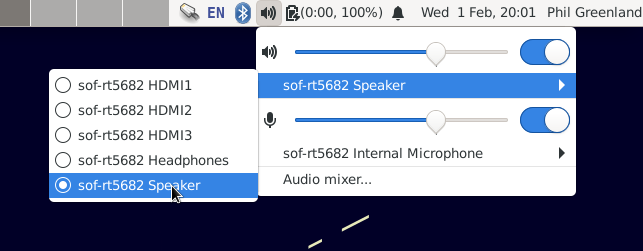
There’s a few other audio snafus to be aware of. The most annoying one is the internal microphone. You’ll find it works having applied the configuration above but no matter how high you turn up the volume it’s still too quiet.
While nosing around the Chromebook UCM files I spotted a strange looking property which hadn’t been mentioned in the ALSA documentation anywhere. The internal microphone had a property called “IntrinsicSensitivity” set against it. After some digging around I found a reference to this in the CRAS source code. It seems that CRAS applies software gain to the microphone input based on this value and the volume level setting.
I couldn’t find a way of applying a fixed software gain to the internal microphone input in PulseAudio, yet alone expressing my requirement though UCM. If anyone does please let me know. Short of writing my own PulseAudio module (which I briefly considered), I found that on the command line you can request the gain be higher than the 150% limit set in the audio mixer GUI.
Therefore the following command will increase the internal microphone volume to a reasonable level:
pactl set-source-volume 5 325%
In case the index changes, the correct value can be looked up with:
pactl list sources
The final audio related item that doesn’t work is automatic switching from Speaker to Headphones and back when they’re connected.
Jack detection works, in that PulseAudio is aware of the status of each of the jacks, as can be seen in the audio mixer GUI. If headphones are connected they have to be manually selected, although when disconnecting them the speakers will be automatically re-selected. Looking at the older PulseAudio configuration format, it used to be quite common for the insertion of the headphones to trigger an action which marked the speakers as unavailable. Thereby forcing PulseAudio to reconsider available inputs, selecting the headphones which are both higher priority and more importantly available. Unfortunately I haven’t found a way of expressing this though ALSA’s UCM configuration mechanism.
Suspend to RAM
The final item on the list turned out to be the most fiddly but also somehow the most interesting. There turned out to be two reasons why suspend to RAM wasn’t working.
The first part of the fix is relatively straight forward. The kernel had for some reason selected suspend-to-idle (s2idle) over suspend-to-ram (deep) mode, as described in the admin guide.
This can be checked by:
cat /sys/power/mem_sleep
The following should be returned:
[s2idle] deep
Indicating the s2idle is currently selected.
The admin guide hints that the default mode can be overridden by passing the parameter mem_sleep_default on the kernel command line.
We can do this by editing the grub configuration file /etc/default/grub and adding the following to the GRUB_CMDLINE_LINUX_DEFAULT property:
mem_sleep_default=deep
Followed by updating grub’s configuration files:
sudo update-grub
This will get the system correctly suspending to RAM. However waking is a different matter. If tested at present the system will wake to a bootloader screen which says “Something went wrong”. Thats partly true, something did indeed go wrong but it wasn’t anything to do with the way Debian suspended the system.
As mentioned in my previous post most if not all Chromebooks now contain Google’s trusted platform module known as the CR50. It just so happens that if there is no communication with that chip by the operating system the CR50 indicates to the bootloader that the last boot failed for some reason, producing the aforementioned message.
Debian don’t include the required CR50 driver in their stock kernels unfortunately, but thanks to the dynamic kernel module support package (DKMS) we can have the missing kernel modules built automatically whenever the kernel is updated by the Debian folk. The following was inspired by another blog post, which in turn was inspired by someone else’s post.
The basic idea is rather than using DKMS to build a custom kernel module, we can instead use it to build and install a module that could have been included as part of the kernel build but wasn’t enabled when it was built.
To do this we’ll install the tools required to build kernel modules automatically:
sudo apt-get install dkms
Next we create a DKMS configuration directory for the kernel module we’d like to build:
sudo mkdir /usr/src/tpm_tis_spi_cr50-1.0
Adding the following configuration file
sudo tee /usr/src/tpm_tis_spi_cr50-1.0/dkms.conf << 'END'
PACKAGE_NAME="cr50"
PACKAGE_VERSION="1.0"
BUILT_MODULE_NAME="tpm_tis_spi"
DEST_MODULE_LOCATION="/extra"
AUTOINSTALL="yes"
REMAKE_INITRD="no"
PRE_BUILD="downloadpatchmodule.sh"
END
Along with the following helper script:
sudo tee /usr/src/tpm_tis_spi_cr50-1.0/downloadpatchmodule.sh << 'END'
#!/bin/bash

# kernelver is not set on kernel upgrade from apt, but DPKG_MAINTSCRIPT_PACKAGE
# contains the kernel image or header package upgraded
if [ -z "$kernelver" ] ; then
  echo "using DPKG_MAINTSCRIPT_PACKAGE instead of unset kernelver"
  kernelver=$( echo $DPKG_MAINTSCRIPT_PACKAGE | sed -r 's/linux-(headers|image)-//')
fi

# Split version up
vers=(${kernelver//./ })   # split kernel version into individual elements
major="${vers[0]}"
minor="${vers[1]}"

# Retrieve complete version, major.minor.patch version from headers
complete_ver=$(make -C /usr/src/linux-headers-${kernelver} --no-print-directory kernelversion)

echo "Downloading kernel source $complete_ver..."
curl -L https://mirrors.edge.kernel.org/pub/linux/kernel/v$major.x/linux-$complete_ver.tar.xz -o kernel.tar.xz

echo "Extracting kernel source..."
tar -xf kernel.tar.xz linux-$complete_ver/$1 --xform=s,linux-$complete_ver/drivers/char/tpm,.,

echo "Override TPM makefile..."
cat << ENDMAKE > Makefile

# Build tpm_tis_spi module (which contains CR50 driver)
obj-m += tpm_tis_spi.o
tpm_tis_spi-y := tpm_tis_spi_main.o
tpm_tis_spi-y += tpm_tis_spi_cr50.o

# Force CFLAGs (overriding debian config, which would otherwise cause a build error as CR50 isn't expected)
ccflags-y := -DCONFIG_TCG_TIS_SPI_CR50

ENDMAKE
END
Which of course needs to be executable:
sudo chmod +x /usr/src/tpm_tis_spi_cr50-1.0/downloadpatchmodule.sh
We can then register the configuration with DKMS such that it will be built for the current kernel and again during any updates:
sudo dkms install tpm_tis_spi_cr50/1.0
Reboot and check dmesg to ensure the driver is now loaded:
sudo dmesg | grep Cr50
If a search result is returned you’re good to go. Suspend to RAM should be working properly.
If you’ve managed to follow along this far, you’re all done, enjoy Debian on your Chromebook.
Additional Notes
zRAM Compressed Swap
The default Debian installation includes a swap partition on the eMMC drive. In order to reduce wear and tear on the drive, while also improving performance I decided to implement zRAM based swap as ChromeOS itself now does. zRAM (formally compcache) is a kernel module which creates a compressed block device in RAM. This compressed block device can be used as swap, to be used in preference the eMMC based swap. I’ve based my notes below on a combination of a TechRepublic article and notes from Gentoo.
First instruct the kernel to load the zram module automatically:
echo "zram" | sudo tee /etc/modules-load.d/zram.conf
Next set the module options such that a single zram device will be created:
echo "options zram num_devices=1" | sudo tee /etc/modprobe.d/zram.conf
Next create a udev rule to set the zram device size and compression algorithm, before preparing it as a swap device:
echo 'KERNEL=="zram0", SUBSYSTEM=="block", DRIVER=="", ACTION=="add", ATTR{disksize}=="0", ATTR{disksize}="2G", ATTR{comp_algorithm}="lzo-rle", RUN+="/sbin/mkswap $env{DEVNAME}"' | sudo tee /etc/udev/rules.d/99-zram.rules
Next add the new swap partition to the fstab file such that it gets mounted automatically:
echo "/dev/zram0 swap swap pri=16383 0 0" | sudo tee -a /etc/fstab
This will cause the zram device to be mounted as additional swap, with a priority much higher than the eMMC’s swap partition, encouraging the kernel to prefer it.
Finally reboot.
Once back at the desktop, open a terminal and check for the new swap with:
sudo swapon -s
If all has gone well you should see two entries, the eMMC swap partition and /dev/zram0, the new compressed RAM based swap partition.
Leave a Reply